Using a Compass - The Basics
Using a Compass I quite often run into fellow backpackers during my hikes and enjoy chatting with them about where they're from and what they're doing, the usual trail chit-chat. A lot of the time our conversations include discussions about the current hike and conditions along the trail, where to find water and areas to avoid if necessary, sharing information with fellow hikers is one of the best parts of meeting people along the trail, in my opinion.
However, on more than one recent occasion (too often, in fact) the conversation has included the seemingly innocent question of "so, where are we on the trail - any idea?" To which I am always shocked and usually ask, "don't you carry a map and a compass?" This elicits several knee-jerk responses, the most frequent being, "yes, but I'm not exactly sure how to use the compass," along with a sheepish grin. Inside my head I'm thinking, "then why are you carrying it and how on earth do you navigate your position?"
Using a map and a compass is such a fundamental part of being outdoors or hiking that it should be one of the very first things that you learn before setting off to the wilderness. For heavens sake people, learn the basics, it just might save your life one day. So to that end, I thought I'd explain the basics of how to navigate with a compass using a map and how to determine your current position using a compass and your bearings.
Anatomy of a Compass
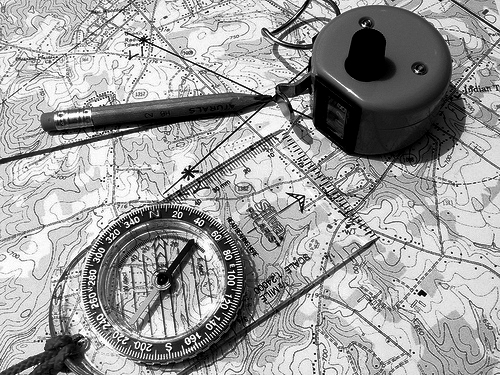
First, let's start with understanding the parts of the compass, knowing what they do, and how to use them. Then we'll use a simple three-step technique to apply this knowledge to navigating direction using a map. Below is a photograph of my hiking compass. It's by no means one of the more expensive models available, but it is a quality device that I know will work when I need it to. My particular compass model is a Silva Polaris and costs about $25. It's easy to use, accurate, reliable, and compact.
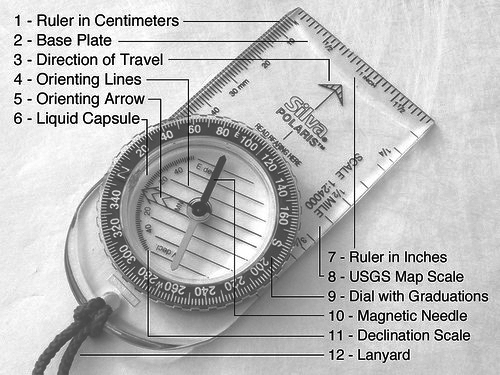
Anatomy of a Compass
- A small length of centimeter increments along the left side of the base plate for measuring
- The plastic base plate helps keep the compass level and flat
- The direction of travel arrow is used to navigate towards your desired destination (see below). It is also used as the Index Line for taking a bearing reading
- These lines help to orient the correct direction for north from your map
- The orienting arrow is used to make sure that the magnetic needle is always pointing north, thereby giving you the correct direction of travel
- Most good quality compasses have liquid filled capsules that house the magnetic needle. It helps the needle settle down more quickly
- A small length of inch increments along the top edge of the base plate for measuring
- USGS map scale ruler (1:24000) used for measuring distances on your map
- Rotating dial with degree graduations. Used to determine your bearing
- The magnetic needle always points in a north/south direction. The black or sometimes red end of the needle indicates magnetic north
- Declination is a way to make very small adjustments to your bearing to account for the difference between magnetic north and true north
- My compass didn't come with a cord attached, but it did have a lanyard hole. About the best thing you can possibly do is to add a small length of sturdy cord to your compass. I use blaze orange tether cord because it's strong and will help me spot my compass if I drop it on the ground
How to Use a Compass
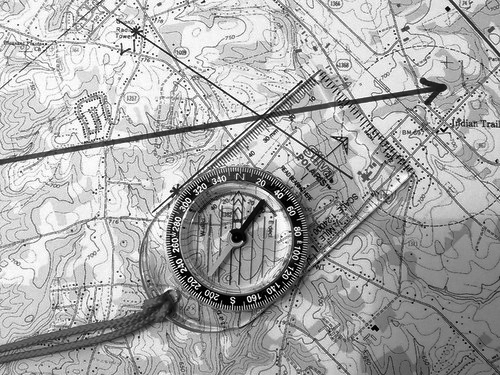
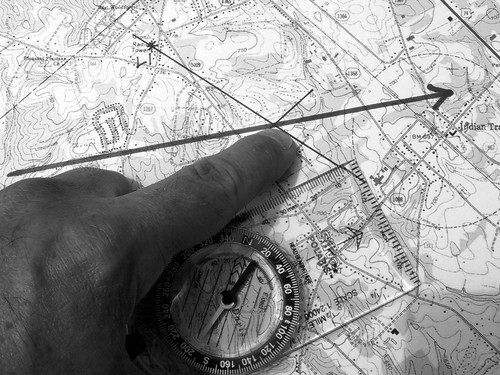
Step 1: Lay your map down somewhere flat if you can and place your compass on top. Draw a line between your starting point and your destination to show the direction of travel. Now, line up the base plate edge with the direction in which you want to go, represented in the photo by the highlighted line on the map.
Step 2: Keeping the base plate edge of your compass in line with your direction of travel, carefully rotate the graduated dial until the N, orientation arrow (5), and orientation lines (4) are all pointing in the direction of north on your map. On most maps north is straight up, but make sure you check with the legend on the map that you are using, I've seen maps that do not adhere to this cartographic convention. Ignore declination for now, if accuracy is not critical and the distance you have to travel is not enormous, you should be able to use the compass without declination adjustment.
Step 3: Remove the compass from the map and hold it level out in front of you with the direction of travel arrow (3) is pointing straight ahead. Turn your body until the north end of the magnetic needle (in my case it's the black end, sometimes it's red) is directly over the orienting arrow (5), pointing to the “N” on the dial.
The direction of travel arrow is now pointing in precisely the direction you want to travel in order to reach your destination. The easiest way to use your compass now is by using the "snap a line" method. While holding your compass in the direction of travel, look up and sight a landmark or object that is not too far away and is in the direction you want to travel. Put your compass away or hang it around your neck and start walking towards the landmark or object that you spotted. Once you reach it, repeat the process by holding your compass as before making sure it is still set according to your map, sighting another landmark, and walking to it. Continue doing this until you reach your destination.

How to Find Your Exact Position on a Map
Now that you know how to use a compass to navigate in the direction you want to travel, the next step is to learn how to determine exactly where you are along that path at any give point. This is another important use of a compass and another important lesson worth learning.
In order to determine your position, you will need to choose two visible landmarks that you can easily identify on your map. Power lines, bends in rivers or streams, mountains, and lakes are perfect for this. Choose two that you can see from where you are standing and mark them on your map as L1 and L2.
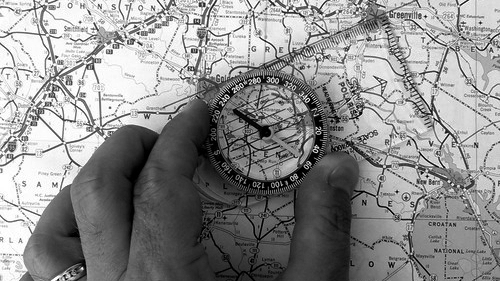
Holding the compass directly in front of you, point the direction of travel arrow toward the first landmark (L1) and rotate the compass dial until the black end of the magnetic needle points to “N” on the dial. Read the heading at the index line (which is the same as the direction of travel arrow).
Place the compass on your map with base plate edge touching the first landmark (L1). Pivot the compass around on L1 until the orienting arrow or orienting lines align with the magnetic north lines on your map. Draw a line from the landmark (L1) along the side of the base plate across your map. Repeat this process for the second landmark (L2) and where the two lines intersect on your map is your exact location.
I'm not sure why so many people struggle to use their compass correctly or just don't bother to learn. As you can see it's pretty simple and the two techniques I've described above are extremely useful and important ways for you to determine where you are and where you should be going. Hopefully this has helped some of you and for other it might just be a quick refresher course.